Welcome to How I Brew
(All the thumbnails are clickable to a larger image to help this page load quicker.)
This document is intended to illustrate the issues involved in doing a full mash (with cereal mash) brew session. I use a modified EZMasher in food grade five gallon bucket mash system. It works well for me, and I hope that this description will convince some of you out there to make the short step from partial mashes to full mashes. The beer I made for this demonstration was a Classic American Pilsener, as described by Jeff Renner on the HomeBrew Digest.
The balance of this document will consist of a picture, and accompanying caption that describes the steps shown in the picture. Have Fun, and give me some feedback on my process, descriptions, etc.
| Equipment |
|
This is intended to provide a short description of the equipment I use when doing all grain brews. |
Your setup can vary by quite a bit, but I feel these are the minimums necessary. |
 |
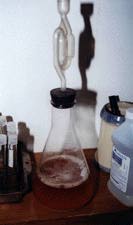
This is an Erlenmeyer flask purchased from my local chemical supply store. I purchased it for $3.00, and it has been the best $3.00 I ever spent. With this flask, I can produce yeast starters that encourage yeast growth. |
The more active yeast cells you can pitch into the cooled wort, the faster the fermentation will start, and generally will keep down any infections you may have picked up in your process. |
 |
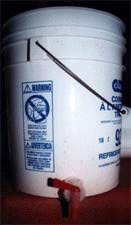
This is much like it appears. A five gallon food grade bucket. I got about six of them all at once by asking nicely for them at a local restaurant. (n.b. Being nice is the secret to this game. Losing your temper at yourself or at others will not make you a better brewer. It will just make you a jerk.) I purchased the spigot assembly from a local brewshop for about $2.00. |
It is very valuable, and serves many purposes. Keep yours very clean! OK, you might have noticed the Claussen emblem on the bucket, signifying it as a former pickle bucket. I have never had anybody complain about pickle tastes in my beers, and I even use this bucket for bottling! Charlie P. doesn't always know what he's talking about... |
 |
This is a homemade EZMasher rip-off. I made mine for less than a dollar in parts from stainless steel screen and hose clamps I purchased at a local hardware store. I love it, and I think it is a worthy addition to any 5 gallon brewing set-up. |
Plus, you can't beat the price. You can't see the 1/2 inch OD tubing that is stuck in the end. |
 |
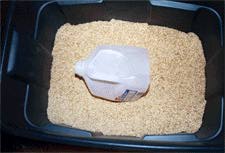
This pic just shows how the EX masher sits on the bottom of the mash tun. The 1/2 inch tubing fits into the back of the spigot assembly (at eight-thirty in this picture). Like I said, this arrangement works pretty slick. |
 |
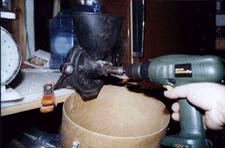
This is my mill. There are many like it, but this one is mine. This is an antique grain mill that I picked up at an antique store for $5.00. It is a Corona style mill, but it is infinitely adjustable. It has TWO adjustment screws, so you can really refine your crush. It works really well for me. |
It used to have a disgusting 16 inch handle on it, but I removed it and found that a 12 point 3/4 inch socket goes right on there. Motorizing with a cordless drill was a snap. I can mill ten pounds in about twelve minutes. |
 |
My pot. No not cannabis. My ten gallon Aluminum stockpot. I got this for seventy-five dollars from a mailorder house on the west coast. I'm not concerned with the supposed effects of aluminum on the human brain, and I encourage others to not be afraid either. |
I would like a Vollrath 15 gallon pot, so I can do ten gallon boils, but that's a ways off. |
| Yeast Starter Preparation |
|
OK, I realize that this site is supposed to be about all the things I do on brewday. However, since the final step in the process is pitching yeast, I need to have some yeast ready for that to happen. As I see it, there are two options:
1. You can use two satchets of dry yeast rehydrated per instructions on the yeast packet, or
2. Make a starter from another source. |
These other sources can be a smack pack of wyeast pitched into 500ml of sterile wort, or a pure culture produced up in increments from 5 ml to 50ml to 500ml. The former step should be started two days in advance of brewday, and the latter takes me two weeks. The choice is yours. You want to have as much yeast slurry as you can get so the fermentation lag time is short and fermentation is brisk. |
| Water Filtration and Heating |
 |
Water makes up more than 90% of most beers. The importance of water quality to the final product cannot be overstated. I use a countertop carbon filtration system to treat my locality's water supply. I run twelve gallons through it, which is enough for five gallons of beer, and warm water at the end for cleanup. |
|
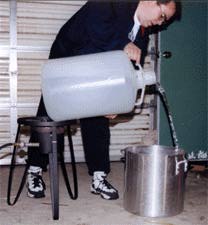
I then pour about eight gallons of water in the ten gallon brewpot and place this water on the propane burner to start warming up. By the time I have the grain all squared away, and doughed in, it is time to add the 170 degree F water to the mash tun for the saccharification rest. But I have gotten ahead of myself... |
| Weighing and Milling Grain |
 |
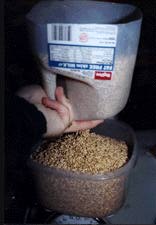
This picture shows the grain storage container I use (an eighteen gallon Rubbermaid container), and the device I use to transport the grain from the grain bin to the scale (a milk carton with the bottom cut out). Pictured is Schreier 2-Row malted barley. |
 |
In this picture, you can see how I scientifically control the amount of grain I weigh out. I put two fingers over the hole in the bottom of the "mystery device" and when I want to pour some out, I simply move my fingers out of the way, and let gravity do the work. |
|
This is the setup I use to mill my grain. On the left side of the picture, you can see the scale I purchased for $5.00 at a Goodwill store here in Iowa. It weighs up to twenty-five pounds in ounces. In the center of the picture is my motorized mill setup. I paid $5.00 for the mill at an antique store. It is cast iron, and is in very good shape. |
It was obvious that it had gotten a good workout in its previous life as a functional grain mill in someone's house. It is a corona style, which means that a rotating plate crushes the grain against a stationary plate inside the housing. |
|
Most people who disparage Corona mills say that it tears the husk too much to be of value. To them I say, "It works for me." Besides, since I use something akin to the EZMasher, I could probably sparge flour. My system works quite well for me. The mill came with an ugly sixteen inch handle, which I removed to find a square nub on the end of the rotating plate. |
Upon further investigation, I found that a 12 point 3/4-inch socket fit very snugly on this nub. With the purchase of a 3/8 male to 1/4 inch male socket adapter, I was able to attach any drill to the mill to motorize it. |
|
The first drill I used was destroyed inexplicably. The drill I have now has five torque settings and a hammer drill setting. I set the drill on three and it works smoothly. |
Anything higher, and it jerks in my hand when the drill hits objects harder than grain, and anything less and it won't turn the plate very well under load. |
| Adding Grains to the Mash Tun |
 |
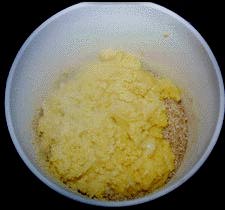
This is the milled grain (on the bottom of the yellow mass) and the corn meal adjunct that I previously had boiled and have just now added to the mash tun. The recipe called for twenty percent of the mass to come from adjunct corn meal, so I have in the tun: eight pounds of milled two row malted barley, and two pounds (dry weight) of gelatinized corn meal. |
 |
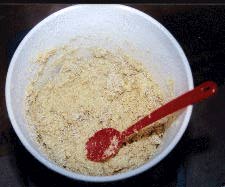
This is how the whole mess looked like after I stirred it up. This process is called doughing in. The corn meal mush had jsut a little extra water in it, and helped to get the grains all evenly separated from each other. The next step is adding enough water to the mash to bring the temp of the whole thing to 151 F or so. |
We want a higly fermentable wort for this style. Before measuring the temp, be sure to completely mix the mash so it's not lumpy. A little on the thin side is fine. |
| Recirculating and Sparging |
|
After waiting for the saccharifcation rest to complete, it's time to separate the sweet liquor (which the yeast will turn into CO2 and alcohol), from the "spent grains" (which the compost heap just loves). This process is called sparging. Depending on how you do it, it can be a complex process of constantly adding water to the top of the grain bed while drawing sweet wort from the bottom. |
Or you can do a batch sparge which means you run the tun dry once, then refill it with hot water, mix the grains, and draw more sweet wort off the bottom. Before you get too excited about sparging, you must recirculate the wort until it runs clear. That reduces the amount of husks, gunk, and stuff that was once part of the grain, but is insoluble (thus useless to us). |
 |
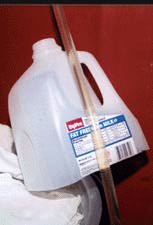
This picture should give you a good idea of how clear your runoff should be going into the boiling kettle. Note how you can read the label behind the tube with flowing wort. |
| Boiling |
 |
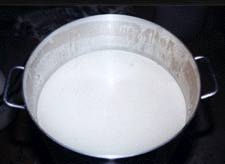
We want to accomplish several things with the boil. We want to coagulate a proteinaceous fraction of the wort, we want to extract the bitterness, flavor, and aroma out of the hops, and we want to at least pasteurize the wort, so the yeast can work uncontested (for the most part.) To get the bitterness out of the hops, we need to boil the wort for at least sixty minutes. By boiling for sixty minutes, we are boiling off the fraction of the hops that normally corresponds with the flavor and aroma of the hops. |
So, the first addition (or the sixty minute addition) is the bittering addition. Adding hops at fifteen minutes left will contribute flavor from the hops, and adding hops at five minutes to go, or less will contribute aroma. This is a particularly bad picture of the boil, but does show wonderfully how the protein stuff will rise to the top of the boiling vessel. |
| Chilling |
|
I don't have a picture of my chiller. Sorry. The purpose of chilling the now pasteurized wort is to bring the temperature from 212 degrees F to around 70F. This is another way to reduce the number of beer spoiling bacteria that can replicate in your wort. It is also very hard on your yeast if you pitch them into wort warmer than 100 degrees. |
I use an immersion chiller. That is a coil consisting of about 25 feet of copper tubing, with hoses connecting a water source to the tube, and an outlet hose to at least direct the flow of the hot outflow. I use a garden hose to provide the water to the chiller, and run the hot water outside my garage on the ground. This process usually takes around fifteen minutes. |
|
Once, the two water hoses (the inlet and the outlet) came off the chiller because the water pressure was too high. I now lean the two arms of the chiller on the side of the 10 gallon pot (so the chiller is tilted sideways) and wrap the arms in towels to keep any drips out of the wort. |
I have found that this tilt also disturbs the convective process in the hot wort, and results in chilling the wort much faster than putting the chiller flat on the bottom of the pot. |
|